How do I add a new report?
Set the fiscal year
By default, Banktivity uses January 1 as the starting date for the fiscal year. If your reports should use a different date, choose File > Set Fiscal Year, enter the appropriate date, and click "Set Start Date." From this point forward, new reports and budgets will use the new date, but those you created before changing the fiscal year retain the original starting date.
Create a report
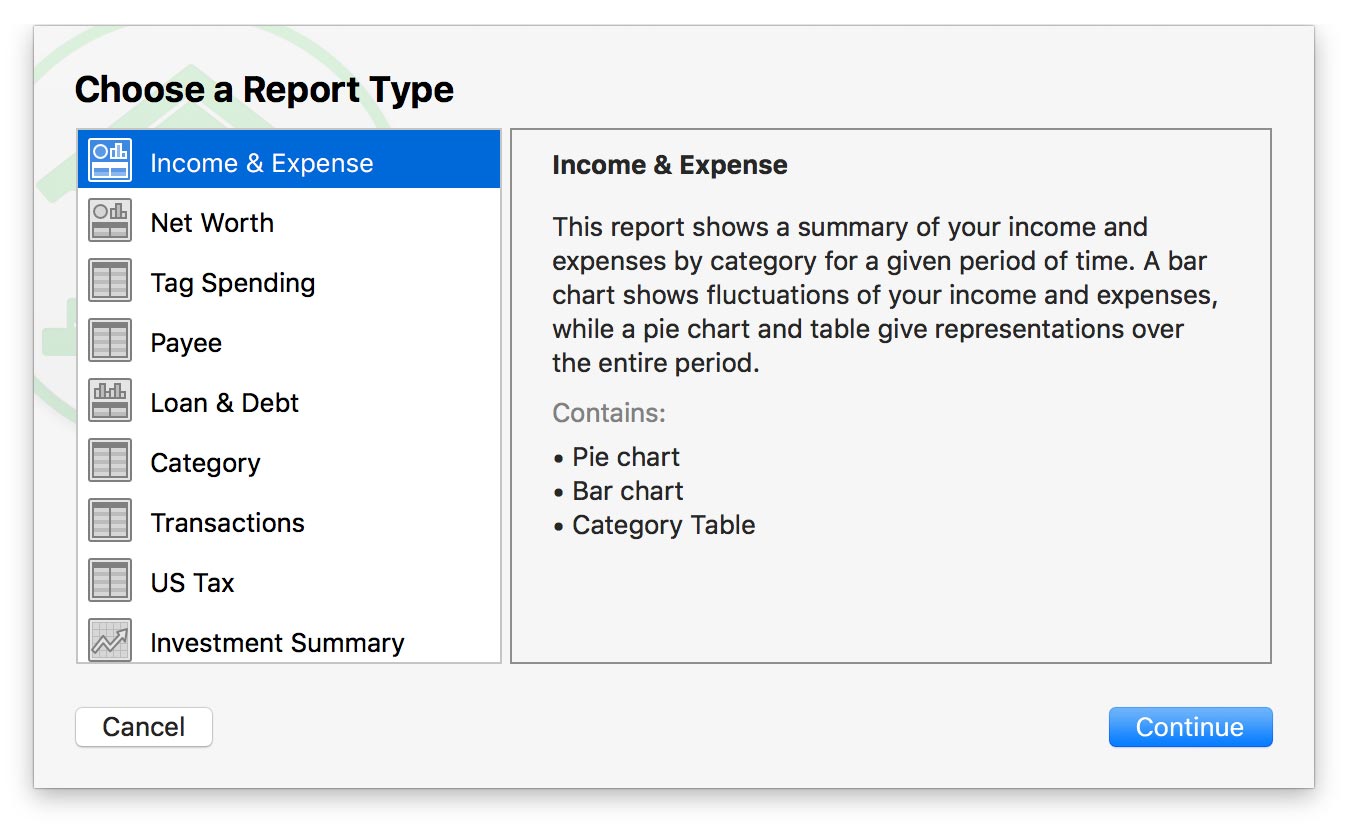
Click the plus (+) button on the toolbar and choose "Add New Report," or choose File > Add > Report. Banktivity will first ask what type of report you want:

- Income & Expense: Analyze the cash flow in and out of your accounts based on your categories and view a profit & loss statement.
- Net Worth: Compare your assets and liabilities on a balance sheet and graph your wealth over time.
- Tag Spending: View income and expense totals for your tags, and see detailed transaction lists for individual tags.
- Payee: View income and expense totals for your payees, and see detailed transaction lists for individual payees. Check "Group by category" to group and subtotal payees by category.
- Loan & Debt: Analyze the money you owe for loans, credit cards, and other forms of debt (including investments that aren't performing well).
- Category: View a table showing the details of your transactions, grouped and subtotaled by category.
- Transactions: View a table showing the details of your transactions, grouped and subtotaled by account. Use rules to limit what transactions are included.
- US Tax: Analyze tax-related information including income and expense categories and capital gains from your investments.
- Investment Summary: Analyze your investments in depth, including market value, capital gains, portfolio diversity, and return on investment (ROI).
- Forecast: Project your account balances into the future using scheduled transactions.
Select a report type, then click "Next" to configure options for the new report. Depending on the type you choose, some or all of the following options will come up:
Give your report a name
This screen lets you name the report to help you identify it in the sidebar. If you have accounts with multiple currencies, you can also specify how figures on the report are displayed. The default option is to convert totals to the document's display currency. You can specify another currency to use by unchecking "Always use the document's display currency" and selecting a currency with the popup menu button.
To set the document's display currency, click "Configuration" in the sidebar, then click "Currencies." Use the popup menu button at the top right to choose a currency to be used as the default for new accounts, budgets, and reports.
Select a date range
This screen lets you choose a date range for the report. Click the popup menu button and select from a variety of predefined ranges. Ranges that end with "to Date" indicate periods of time that are relative to the current date; other ranges represent fixed periods of time. Choose "Specific Start and End Dates" to define an exact range by entering two dates.
Show a comparison date range
Some reports allow you to compare two date ranges side by side. To use this option, check "Include comparison period." By default, the report will show the date range immediately preceding the one you chose on the last screen. For example, if you chose "This Year" as the report's date range, then chose to include a comparison period, the final report will show totals for the current and previous years side by side. After you finish setting up the report, you can refine the comparison date range using the report editor (see below for more details).
Choose accounts
This screen shows a list of all accounts that are currently visible. To have the report use all available accounts (including new ones that you add in the future), leave all accounts unchecked and simply continue to the next screen.
If you want to limit the scope of the report, check off the accounts you want to include. New accounts that you add in the future can be included in the report by using the report editor (see below for more details).
One reason you may exclude accounts from a report is so that you can treat transfers to certain accounts like categories (such as savings contributions or credit card payments). Transfers are only counted on reports when one, not both, of the associated accounts is included.
Choose categories
This screen shows a list of all your categories. To have the report use all available categories (including new ones that you add in the future), leave all categories unchecked and simply continue to the next screen.
If you want to limit the scope of the report, check off the categories you want to include. Checking a category that contains sub-categories will include both the parent category and its sub-categories in the report. New categories that you add in the future can be included in the report by using the report editor (see below for more details).
Include uncategorized transactions
This screen allows you to specify whether or not uncategorized transactions should be included in the report. Check the first box to include deposits without categories; check the second to include withdrawals without categories.
Including uncategorized tranasctions can help you to identify gaps in your record-keeping or activity that your budget failed to take into account. It will also help to ensure that the report presents a holistic view of your finances, regardless of how well you categorize transactions. It is a good option to use when you are looking at the "big picture."
By contrast, if you are trying to analyze the details of a particular category or other subset of your finances, you may want to leave out unknown activity. Omitting uncategorized transactions will help you to focus on the details in this case.
Be sure to pay particular attention to these options when creating Tag Spending and Payee reports. Choosing to exclude uncategorized transactions could alter the output of these reports unexpectedly.
Choose tags
This screen shows a list of all your tags. To have the report use all available tags (including new ones that you add in the future), leave all tags unchecked and simply continue to the next screen.
If you want to limit the scope of the report, check off the tags you want to include. New tags that you add in the future can be included in the report by using the report editor (see below for more details).
Transaction options
This screen is only presented when you create a Transaction report. It allows you to define rules that limit which transactions are included in the report. Choose from the following options:
- Any/All of the following are true: If you choose "Any," all transactions that match at least one of the rules will be included. If you choose "All," only transactions that match all of the rules will be displayed.
- Amount is: Use this rule to include transactions that match a specific amount (=) or fall within a range of amounts. Use greater than (>), less than (<), greater than or equal to (≥), and less than or equal to (≤) to define a range.
- Transaction type: Use this rule to include only transactions of a specific type. Leave all types unchecked to include all transaction types.
- Note contains: Use this rule to display transactions that include a specified word or phrase in the "Note" field.
- Memo contains: Use this rule to display transactions that include a specified word or phrase in the "Memo" field on any split item.
Congratulations, report created!
This final screen lets you know that the report has been saved to the sidebar and that you can edit its options by double-clicking it. You can also select the report and click the "Edit" button at the top right of the report to open the report editor:

Edit additional report options
Once you finish creating a report, you can adjust any of the above options using the report editor. Some additional options can be configured as well, depending on the type of report you chose.
Dates: Date Range
Some reports have an option here to "Report across entire date range." Checking this box will cause the report to include all transactions, regardless of their dates. This is particularly useful for Investment Summary reports, which require a complete transaction history to calculate security values correctly.
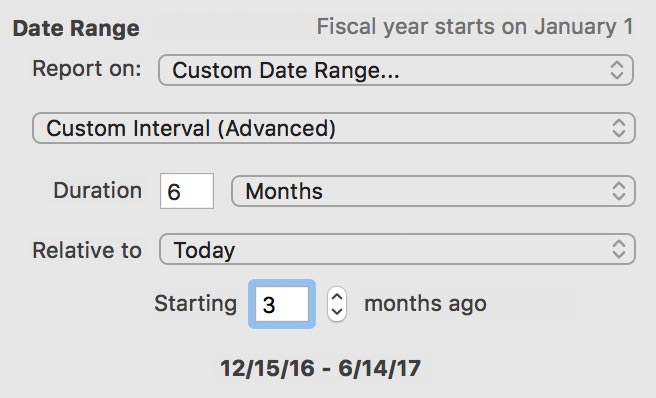
In addition to the date ranges available during setup, the "Custom Interval (Advanced)" setting is available in the editor under "Custom Date Range." Use this option to specify a date range that is relative to a particular date. First, specify the report duration in days, weeks, months, quarters, or years. Next, choose whether the date range is relative to a fixed date, the current date, or the first date of the interval you chose. Finally, enter the fixed date or the offset from the relative date you chose.

In the example pictured here, a duration of 6 months is specified, relative to the current date, with an offset of 3 months. This report will show a date range from 3 months ago to 3 months in the future.
Dates: Bar Chart Options
For reports that include bar charts, this option allows you to specify the interval used on the charts' X-axis. Interval choices depend on the date range selected for the report. If you chose to report on the entire date range, Banktivity determines the bar chart interval automatically.
Dates: Comparison Data
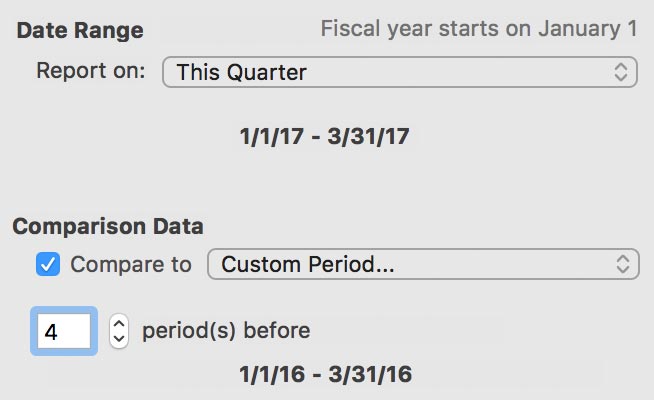
Use this option to enable or disable comparison data on the report. By default, the date range previous to the range selected for the report is shown for comparison, but you can specify a different range by choosing "Custom Period" and entering an offset for a period further in the past.

In the example pictured here, the report is configured with a date range showing the current quarter. The comparison data is set to 4 periods prior, in order to compare the current quarter with the same quarter from last year.
Accounts
In addition to the account selections available during setup, an option is available in the editor to "Limit results using rules." Use this option to define which accounts are included in the report based on a series of rules:
- Any/All of the following are true: If you choose "Any," all accounts that match at least one rule will be included in the report. If you choose "All," only accounts that match all of the rules will be included.
- Account type: Use this rule to include or exclude all accounts of a particular type.
- Currency: Use this rule to include or exclude all accounts that use a specific currency.
- Limit to liability accounts: Check this box to include all liability, loan, credit card, and line of credit accounts. This setting takes precedence over the "Account type" rule above.
Tags & Categories: Categories
In addition to the category selections available during setup, two other options are available in the editor to choose which categories are included in the report:
- Report on categories and accounts except:
Choose this option to exclude specific categories and transfers from the report, but include new categories automatically when they are added to the document. Checking a category that contains sub-categories will exclude both the parent category and its sub-categories. When no items are checked, all categories and account transfers are included. - Report using rule criteria:
Choose this option to limit the report to certain categories and account transfers based on a series of rules:- Any/All of the following are true: If you choose "Any," all categories that match at least one rule will be included in the report. If you choose "All," only categories that match all of the rules will be included.
- Taxable categories: Use this rule to include all categories that are designated as "Taxable."
- Expense categories: Use this rule to include all categories that use the "Expense" type (as opposed to "Income").
Payees
This option allows you to limit a Payee report to specific payees. Click the plus (+) button to add a new item to the list, then double-click it and type in the name of the payee to include. Select a payee in the list and click the minus (-) button to remove it. Only the payees shown in the list will appear on the report. If the list is empty, all payees will be included.
Securities
This option allows you to limit an Investment Summary report to specific securities. Use the filter box to help you find securities, then check off the ones you want to include in the report. If all items are unchecked, all securities will be included.